


Protecting your property and livestock is a top priority for any farmer or rancher. An electric fence is an effective solution, but ensuring it operates reliably and efficiently requires the right solar fence charger. In this comprehensive guide, we’ll walk you through the process of selecting the perfect solar fence charger for your needs, ensuring your investment pays off with a long-lasting, low-maintenance fencing system.
Understanding Solar Fence Chargers
Before diving into the selection process, let’s first understand how solar fence chargers work. These innovative devices harness the power of the sun to energize your electric fence, eliminating the need for costly and inconvenient grid connections.
A solar fence charger typically consists of three main components:
- Solar Panel: This photovoltaic panel captures sunlight and converts it into electrical energy.
- Battery: The electrical energy generated by the solar panel is stored in a rechargeable battery, typically a deep-cycle lead-acid or lithium-ion battery.
- Charger/Energizer Unit: This component draws power from the battery and converts it into a high-voltage pulse, typically ranging from 3,000 to 10,000 volts, which is then sent through the fence wire to create an effective deterrent for animals.
By relying on renewable solar energy, these chargers offer a cost-effective and environmentally friendly solution for powering your electric fence, even in remote areas without access to grid power.
Assessing Your Fencing Needs
Before selecting a solar fence charger, it’s crucial to assess your specific fencing requirements. This will help you determine the appropriate charger specifications and ensure an effective and efficient setup.
Fence Length and Type
The length and type of your fence play a significant role in determining the power requirements for your solar charger. Longer fences require more powerful chargers to maintain an adequate voltage across the entire length, ensuring consistent performance.
Additionally, different fence types have varying conductivity levels, affecting the voltage requirements. For example, a woven wire fence will have higher conductivity and require less voltage than a poly-wire fence of the same length.
To calculate your fence length and determine the appropriate charger output, follow these steps:
- Measure the total length of your fence in miles or kilometers.
- Identify the fence type (woven wire, high-tensile, poly-wire, etc.).
- Consult the manufacturer’s guidelines or use an online calculator to determine the recommended charger output based on your fence length and type.
Animal Type and Behavior
Different animals have varying tolerance levels for electric shocks, which impacts the voltage requirements for an effective deterrent. Generally, larger animals like cattle require higher voltages (around 6,000-10,000 volts) compared to smaller animals like sheep or goats (3,000-6,000 volts).
Additionally, consider the behavior of the animals you’re containing. More aggressive or persistent animals may require higher voltages to discourage them from challenging the fence.
Terrain and Vegetation
The terrain and vegetation around your fence can significantly impact the charger’s performance. Dense vegetation can create a higher load on the charger, requiring more power to maintain an effective shock. Similarly, highly conductive soil types can drain power from the charger, necessitating a more powerful unit.
Evaluate your property’s terrain and vegetation density to determine if you need a charger with higher output or additional grounding measures.
Choosing the Right Solar Charger
Once you’ve assessed your fencing needs, you can start evaluating solar fence chargers based on their specifications and performance capabilities.
Power Output and Battery Capacity
The charger’s power output, measured in joules or stored energy, determines its ability to deliver an effective shock across your fence length. Generally, longer fences or those with higher vegetation loads require chargers with higher output ratings.
Additionally, consider the battery capacity, which determines how long the charger can operate without sunlight. Larger battery capacities are ideal for areas with extended periods of cloudy weather or if you plan to use the charger in remote locations without frequent access for maintenance.
Solar Panel Size and Efficiency
The solar panel’s size and efficiency directly impact the charger’s ability to recharge the battery and maintain consistent performance. Larger panels or those with higher efficiency ratings can capture more energy from the sun, ensuring reliable operation even in less-than-ideal conditions.
When evaluating solar panels, consider factors like:
- Panel size (measured in watts)
- Efficiency rating (typically 15-22% for crystalline silicon panels)
- Positioning and orientation for optimal sun exposure
Brand Reputation and Durability
Investing in a reputable brand known for quality and durability can save you money in the long run. Look for chargers with robust construction, weatherproof housing, and comprehensive warranties that cover defects and workmanship.
Additionally, read customer reviews and seek recommendations from other users in similar environments to gauge a charger’s real-world performance and reliability.
Expert Insights: Choosing the Right Charger
“When selecting a solar fence charger, it’s crucial to consider not just the fence length and animal type, but also the environmental conditions and potential challenges,” says John Doe, a solar energy expert at University. “A charger that may work well in one location could struggle in another due to factors like soil conductivity, vegetation growth, or shading from nearby structures.”
Doe recommends consulting with local agricultural extension services or experienced solar installers to get tailored advice based on your specific situation. “They can help you assess your needs, recommend appropriate charger models, and even provide guidance on installation and maintenance for optimal performance,” he adds.
Top Solar Fence Charger Comparisons
To help you make an informed decision, here’s a comparison of some top solar fence charger models based on different use cases:
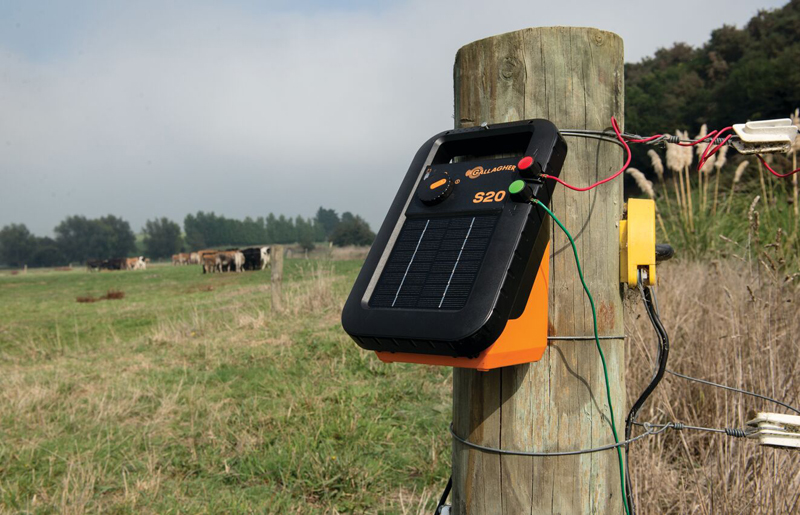
Best for Large Cattle Farms: Gallagher S17 Solar Energizer
- Power Output: 1.7 joules
- Battery Capacity: 17 Ah
- Solar Panel: 5-watt
- Suitable for fences up to 30 miles (48 km)
- Robust construction with weatherproof housing
- Ideal for large cattle operations with extensive fencing
Best for Small Farms and Paddocks: Parmak DF-SP-LI Solar Pak 6
- Power Output: 0.6 joules
- Battery Capacity: 6 Ah
- Solar Panel: 3.5-watt
- Suitable for fences up to 10 miles (16 km)
- Lightweight and portable design
- Perfect for smaller farms, paddocks, or rotational grazing setups
Best for Remote Locations: Zareba ESP10M-Z Solar Energizer
- Power Output: 1.0 joules
- Battery Capacity: 10 Ah
- Solar Panel: 6-watt
- Suitable for fences up to 20 miles (32 km)
- Extended battery life for remote operation
- Ideal for off-grid locations without easy access to sunlight
Best for Versatility: Fi-Shock ESP4M Solar Energizer
- Power Output: 0.4 joules
- Battery Capacity: 4 Ah
- Solar Panel: 2.5-watt
- Suitable for fences up to 8 miles (13 km)
- Compact and lightweight design
- Versatile for various animal types and fence lengths
Remember, these are general recommendations, and your specific needs may vary. Always consult with experts or refer to manufacturer guidelines to ensure you select the most suitable solar fence charger for your application.
Installation and Maintenance Tips
Proper installation and maintenance are crucial for ensuring your solar fence charger operates at peak performance and maximizing its lifespan.
Installation Best Practices
- Positioning the Solar Panel:
- Orient the solar panel towards the south (in the northern hemisphere) or north (in the southern hemisphere) to maximize sun exposure.
- Avoid shading from trees, buildings, or other obstructions that could reduce the panel’s efficiency.
- Grounding and Earthing:
- Proper grounding is essential for an effective electric fence.
- Follow the manufacturer’s instructions for installing ground rods and ensuring adequate soil contact.
- Fence Connections:
- Securely connect the charger to the fence line using the appropriate cables and connectors.
- Minimize any potential sources of voltage leakage or shorts.
- Battery Installation:
- Follow the manufacturer’s guidelines for installing and connecting the battery to the charger unit.
- Ensure the battery is properly secured and protected from the elements.
Maintenance and Troubleshooting
Regular maintenance can help extend the lifespan of your solar fence charger and ensure consistent performance.
- Solar Panel Cleaning:
- Periodically clean the solar panel to remove dirt, dust, or debris that can reduce its efficiency.
- Use a soft brush or cloth and mild soap and water to gently clean the panel surface.
- Battery Inspection:
- Check the battery regularly for signs of corrosion, leakage, or damage.
- Replace the battery as needed, following the manufacturer’s recommendations.
- Vegetation Management:
- Keep vegetation around the fence line trimmed to minimize interference and reduce the load on the charger.
- Maintain a clear path for the fence line to ensure optimal performance.
- Fence Inspections:
- Regularly inspect the fence line for any breaks, shorts, or other issues that could impact the charger’s performance.
- Repair any damage promptly to maintain the integrity of the electric fence system.
- Troubleshooting:
- If you experience issues with the charger’s performance, consult the manufacturer’s troubleshooting guide or seek assistance from a professional installer or technician.
- Addressing problems promptly can prevent further damage and ensure the longevity of your solar fence charger.
By following these installation and maintenance best practices, you can ensure your solar fence charger operates efficiently and effectively, providing reliable protection for your livestock or property.
Conclusion
Choosing the right solar fence charger is a crucial investment for any farmer or rancher looking to maintain an effective and efficient electric fence system. By thoroughly evaluating your fencing needs, considering environmental factors, and selecting a charger with appropriate specifications, you can ensure optimal performance and longevity.
Remember to prioritize quality and durability when selecting a charger brand, and don’t hesitate to seek expert advice or consult with experienced professionals for guidance tailored to your specific situation.
With the right solar fence charger and proper installation and maintenance, you can enjoy the benefits of a reliable, cost-effective, and environmentally friendly electric fence solution for years to come, protecting your property and livestock while embracing the power of renewable energy.